Wednesday 26 December 2012

Research in game genre

We had to choose a game genre and do some research into it, in order to find 12 objects that I would like to model for my project. I have chosen Disney/Pixar animation because I really like the cartoon type games such as Rayman Raving Rabbids on Wii, or any other animation based games. I am quite passionate about cartoons and animations, so I have chosen a few characters and some objects that I intend to study and try to reproduce. Here are some examples:


I really liked the different facial expressions that can be achieved from a very simple pumpkin shape, so I think one of my models will be a pumpkin, seeing that I have included pumpkins in my Environment concept art piece as well, and I would like to tie everything in.


This is another example of a strong emotion created with very simple techniques: oversized mouth with a creepy smile while the dark circles around the eyes imply the same creepy character, strange hairstyle, and voila, you seem to know a lot about this character without seeing the film. (it is from Nightmare before Christmas)


Here is an example of a funny friendly character from Monsters Inc. Even though it has only one eye and it should probably scare you, the facial expression makes him really friendly. He has got a big smile on his face, so he looks like a really opened, happy, innocent character


Wednesday 28 November 2012

frogbot


For my next model, I have started by experimenting with various tools from the tool menu, other than the Sphere 3D which I have already used many times, Szpheres which I have used in a previous project (Dobbie) and other than Cylinders which, again, I have already used in modelling Alice my monster girl.
 I initially started to do a mask using the Extract tool on the right hand side menu. To do a mask, I have taken a human head from the Lightbox tool menu, and with Ctrl pressed, I have drawn a mask on the face. By pressing Ctrl I was masking part of the face. I have initially started from a very low subdivision of the head (Subdiv 1) and smooth out the top part of the face (especially the eye area), and then increased the division level to 5 and did some more smoothing. In order to smooth, all I needed to do was to press Shift and drag the pen onto the graphics tablet. As soon as the smoothing operation was done and the masking was in place, I have pressed Extract from the right hand Tool menu and it basically extracted the "mask" I have drawn on the face. I have now hidden the layer with the head and worked Solo on the mask. However, once I have extracted the mask, I have played with the various options in the Deformation menu and after partially masking and inflating, flattening, skewing, adding perspective and gravity, I ended up with something that looked like 2 robot legs joined together. this gave me another idea and I started to build on that.


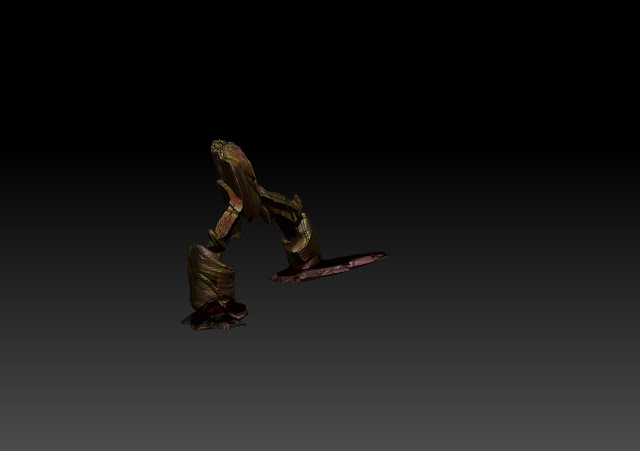
Here we have 2 legs with shoes :) For the shoes I have appended a Gear tool from the Tools menu on the right hand side and again, experimented with the options in Deformation pushing the sides in and making it into an oblong shape ( by using Taper, Squeeze and Bend in the Deformation Tool).I tried then pulling a heel out, but it didn't work, I'm guessing because of the metallic structure of it. So in order to get the bottom of the "shoe" straight, I have masked part of the shoe (by pressing Ctrl and colouring the part that I intended to protect) and then by selecting Clip Curve Brush, I have cut slices of the bottom of the shoe until it became more or less straight. I have then duplicated the layer in order to create the second shoe and by using Rotate from the Deformation Tool menu, I have placed the second shoe on the other foot.


In this screen shot, I have got another Gear 3D around the waist of my model, but I have then decided against using it in that position.


I have then appended a Sphere 3D for the head, from the Tool menu on the right hand side. I have  distorted it by using the Move Elastic brush and increasing the draw size for the brush. After the overall shape was done, I have used GroomSpinKnot brush from the brush palette to give it the texture of "hair" and that's how I have also built the nose (by simply twisting and puling the pen onto the graphics tablet). With Clay buildup brush and Alt pressed, I have scooped out the eye sockets. I have also changed the material for the head to Reflect Yellow which gave me the golden statuesque look .


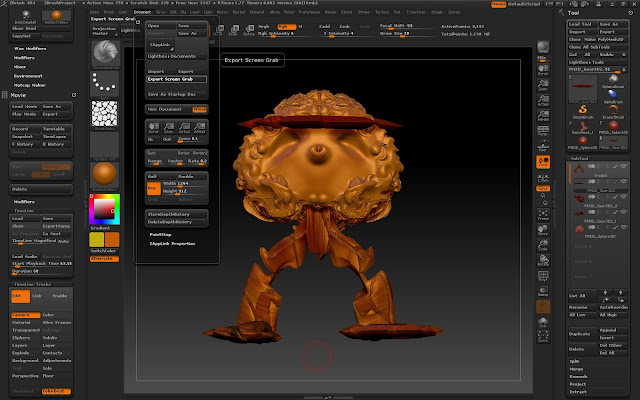
I have  now moved the Gear 3D from the waist line to the top of the head by selecting Move in the Deformation menu on the right, or by simply clicking on Move on the menu above the canvas and then dragging the middle circle. I have now created some sort of head gear. And... Zbrush crushed and closed down before I got a chance to save my model. I managed to save it in JPG format, but the last ZTL file saved was the first one with just legs and shoes...


So here I go again, this time a bit quicker. Same steps to create the head. I spent more time here modelling the nose, purely because I have enjoyed creating a human nose :) With the Rake Brush I have created some lines on the face above the eyes.


I have appended another Gear3D1 and used it as for the eye by using Move and Scale from the menu above the canvas. I have then duplicated this layer with the eye and rotated for the other eye socket. In order to colour the eyes red, I have selected RGB and chose Red from the colour palette and by using free hand brush, I have painted the "eye"red.


I have worked on the eyes Solo and coloured them in red, while giving the eye sockets a black underneath, to recreate an iris. In order to colour the eye sockets, I have worked Solo on the head and by using free hand brush and with the RGB selected, I have chosen black from the colour palette and coloured the eye sockets in black. After making the eye layers visible again, my model looked more realistic.


I have appended an Arrow3D1 and played with Move Elastic and Clay buildup brushes to create his left arm.
I have appended a Cylinder3D1 afterwards for his right arm. I have reduced it in size considerably and again, played with the deformation options (Bend, Twist) to create an arm shaped object. I'm quite happy with the way the two arms came out. For this sort of model, I couldn't have duplicated or mirrored the arms as the model is standing in a bent position, so the arms should be quite different from each other when it comes to positioning


For the last stage I have appended a star (Polimesh3D1) for the base which I have deformed again, with Skew, and flattened it by cutting slices off the top and bottom with Clip Curve brush after masking the middle area. So now my Frogbot is on a start shaped stage. The character itself it futuristic and that's why I went for that sort of stage. From the previous step it was clear to me that my character was a musician of some sort from the position of the legs, and then of the arms. He needed an instrument of some sort in his hands, but again, it needed to be futuristic.
The last tool I have appended it was a Helix3D1 for the "musical instrument" which I have coloured in red selecting RGB and chosing red in the colour palette.

For this project, I have used most of the tools in the pallet, and thoroughly enjoyed creating my Frogbot. (the name comes from his flat froglike feet)


sketch in Zbrush


This is just a small experiment I have done in ZBrush, as I have come across the quick sketch tool. I couldn't resist and played with it a little bit.:)

Alice (monster/girl)


  I have started redoing the one eyed monster, which was our first ZBrush project, and which, I didn't get a chance to bring to a level I liked. But after the basic steps were done, I got a bit carried away and ended up creating another one of my imaginary characters. :)

Here are a few stages of my work on this project.:

This was the stage I should have finished the one eyed monster, but because I had a slight attempt at giving him a "personality", I couldn't stop, so I continued playing with it. Up to this stage I have followed the basics steps showed in my previous post called One eyed monster. Besides that, I have used the Clay buildup brush from the brush palette and with the brush in Spray position, and RGB and Zadd selected, I have drawn the hair by just clicking and dragging the pen onto the graphics tablet, and also the eye lashes. For the iris, I have selected RGB and black from the colour palette to do the centre of the iris followed by choosing purple from the colour palette and selecting spray again for the brush setting and just applying dots around the black circle. For the outer line of the iris, I have selected black from the colour palette, then  decreased the draw size significantly and drew a loose line around the purple bit.


I have tried to change the material for the eye to Mat Cap Metal 02, and that has automatically changed the overall look of the monster. I quite like the shiny look, with light and shade, but it looks more like an ornament than a character, so I carried on...


I have now given her some blue hair by choosing a light blue from the colour palette and selecting spray for the brush setting from the menu on the left hand side of the canvas and clicked and dragged the pen onto the graphics tablet. For this step, RGB was selected and Zadd and Zsub were deactivated.  I have added lovely shiny green lipstick  (ha ha) and an even more beautiful shiny green beauty spot.They were both done following the same steps as the hair. By selecting spray in the brush setting, it gives a different texture to the colour. I have used the same colour for the lips and for the lipstick, but the fact that for the lipstick I have used spray and for the lips just free hand brush, made all the difference. I have chosen the colours intentionally to create a statement, but I realized that I might have gone a bit too far with the combination...


I have now given my character a name (she's called Alice) and some shoes as well.  For the shoes, I have appended a cylinder 3D from the Tool menu on the right hand side and using the Clay buildup, Move Elastic and Clay brushes, I have modelled one shoe. I have also experimented with all the options from the Deformation menu on the right hand side, and can't quite remember which option I kept, as most of them I have only tried and then by pressing CTR+Z, I have deleted the step made. To colour the shoe, I have selected RGB from the top menu and deactivated the Zadd and Zsub and chosen a yellow-limey colour and sprayed the whole shoe, top and bottom with that colour. I have then chosen black from the colour palette and drew the shoe laces and the design at the bottom of my shoe. (there is a design and a surprise at the bottom of my shoe;)) I then duplicated the layer with the shoe by clicking Duplicate on the Tool menu on the right hand side. Using Rotate, and Move, I have placed the second shoe in the right position.


As I have already mentioned earlier, I realised that Alice's colours have been exagerated a bit to the extreme and I have now attempted a different colour scheme for her. I have also modelled her bow (using the Clay buildup brush), as before it was only coloured on. Alice has also "grown" two teeth, so she is now a big girl:) I have remodeled her mouth and jawline by using Move Elastic Brush and Clay buildup brush. For the teeth I have used Clay buildup brush and "pulled" two bits out of the lip, which I then coloured in on off white by selecting RGB in the top menu and selecting a grey-off white colour from the colour palette. I have applied the same method to change the colour of the hair and lips. I have also remodelled the lips by using the Clay buildup brush.

Thursday 22 November 2012

Dobbie


For my next model, I intended to recreate the girl from my character concept art project. Again, I wanted to follow through with my projects from Drawing for games. Here's are a couple of photos of what I wanted to recreate:

This is my Photoshop drawing, nearly completed as an A3 piece for the Character concept art project.


This is my reference image and inspiration for my character. 


So, in order to create my girl as a Zbrush model, I have started off with a ZSphere and pulled up a few more ZSpheres on one side for the pigtail. I have then chose the option of Mirror from the right hand side menu, in order to copy the exact pigtail on the other side of the head. I have then clicked on the Edit button or T as a shortcut and started modelling. I have selected the Move elastic brush from the brush palette in order to deform the head to a more realistic human head, and then chose the Clay buildup brush from the same Brush palette to create the eye brows, by just click and dragging the pen onto the graphics tablet. In order to "dig" the holes for the eyes, I kept the Clay buildup brush and with Alt pressed, I have sculpted inside the head. I have then appended 2 Spheres 3D for the eyes and by using the Move option in the menu above the canvas, I have placed the eye balls in their sockets. In order to do this with precision, I have also selected the Transparent option for the head subtool, from the vertical menu on the right side of the canvas. This helps to see the exact position and size of the eyeballs without the interference of the solid geometry of the head.
I have also clicked on Geometry in Tools on the right side of the screen and Divided my model to subdivision 5, in order to get more accurate details onto the face. This however, increases the number of polygons the model has, and with the detail added, it will probably increase a lot more. In order to import such a model into a game engine, I would need to have no more than  2000-3000 polygons, otherwise it would not work, so I will need to add the detail and try and decrease the number of polies before finishing my model.
However, after an hour of modelling, a few of my colleagues have asked me if I am modelling Dobbie from Harry Potter...  So I did a bit of research, asI am not a fan of Harry Potter movies and am only familiar with the main characters. The photo that I have found online, was pretty similar to my model, so all the comments I have received,  did make sense...
Here's is my new reference/inspiration for my model: 
Dobbie - Harry Potter


So here is an intermediate stage of Dobbie. I have remodeled the ears out of what was meant to be the girl's pigtails. for this I have used the Clay buildup brush from the brush palette to add clay and also sculpt inside the ears. I have then used the Damn Standard brush from the same brush palette and increased the draw size in order to change the cheeks and jawline, to make it look more like Dobbie. Next step: eyes and nose need to get bigger and I think it looks pretty similar to Dobbie.


I have now increased the eyes by first deleting one layer with an eye and then using Scale in the Deformation for the Eye that was left to work on and then duplicating the layer. In order to colour the eye, I have selected Radial symmetry in Transformation ( with the radius left at the default value of 8) and then with RGB selected, brush on spray, I have painted the green for the iris. For the inner part of the iris, I have reduced the drawing size  considerably and selected black from the colour palette. However, I am not quite happy with the lime green for the iris, as it doesn't look at all realistic, so I intend to change the shade of green.


This is just a different angle of the same stage of my model. I have also remodelled the ears and added detail to the eye brows and eye lashes by using Damn Standard brush for the eye lashes with Alt clicked in order to pinch the eye brows, and Using the Inflate brush for the forehead and cheeks in order to make them more obvious and make them look more like the original.


For this stage I have selected Drag Square option for the brush and Kin15.psd as a texture in Lightbox and just dragged the pen on the graphics tablet for the skin texture, to give it the wrinkled look that the original model has got.


This is a video of my Dobbie, just to show how the back was textured as well.
In order to be able to upload the movie on my blog, I have exported the movie made in Zbrush and saved it as a .mov file


Thursday 15 November 2012

cart wheel

For my next model, I have chosen a cart wheel. This is another element present in my environment concept art piece, and that's where I have taken inspiration for my objects as I am trying to follow through with my theme, and try to transpose my 2D drawing into a 3D environment.


For first step in creating the cart wheel,  I have chosen a cylinder 3D from the Tool menu on the right hand side and played with the Inner radius in the Initialize ( Subtool menu), at the bottom right hand side of the canvas. For this model, I have selected the Inner radius size:86, and Z size:6, X and Y size:100. This has basically cut the inside of my cylinder, getting me to this ring shape that I have in my picture above.


After appending a second Cylinder 3D I have reduced it in size by going into Deformation on the right hand side, selecting size and dragging the mouse or pen on the Graphics tablet to reduce the size, I have placed it in the centre of my original ring. this is the inner part of my cart wheel.  I have then appended a third cylinder 3D to go inside the last one and followed the same steps as for the first one. 
I have then applied a wooden texture to the two outer layers and a metallic one to the most inner one.( by selecting Mrgb on top of the canvas, and choosing Mat Cap Sculpy for the outer 2 layers, and Metal for the inner layer.)


For the outer metal layer, I have duplicated the first wheel subtool and cut the thickness of it with the Clip Curve Circle from the brush palette, and added a metallic texture to it ( I have selected MRGB again and chose a metallic material). Using Clip Curve brush from the brush palette and with the symmetry activated ( if you open Transform in the top menu bar, and select Activate Symmetry) in order to cut a uniform slice of the circle , I have cut a little bit off the sides of the outer metal layer.


For the Spoke, I have selected first chosen another cylinder 3D from the tool menu, and reshaped it by going into Deformation  and choosing  size. I then worked Solo on it, to give it quite a lot of detail and make it look as realistic as possible. I have used various brushes: Damn standard, clay buildup, to give it the uneven, wavy shape and also used the Clip Curve brush to cut some bits off.
This is as far as I got in class, but I intend to finish it off in the next session.

Thursday 8 November 2012

pumpkin video

This is a video of my pumpkin in an intermediate stage. I just wanted to show it from all different angles.